Posts

Photoshop shortcuts

In this first blog I will show you a few useful tips for keyboard shortcuts in Photoshop. Comand / Control means Mac users hold down the command key and PC users the Control key. New Layer New layer with dialogue box - Shift + Command/Control + N New layer with out dialogue box - Shift + Alt + Command/Control + N Moving layers Move layer down - Command/Control + [ Move layer up - Command/Control + ] Move to bottom most layer - Command/Control + shift + [ Move to top most lay er - Command/Control + shift +] Select layer below - Alt + [ Select layer above - Alt + ] Copy layers Copy layer - Command/Control + J Copy layer with dialogue box - Command/Control + Alt + J With a selected item Copies selection to a new layer - Command/Control + J Copies selection to a new layer with dialogue box - Command/Control +Alt + J Delete layers. Backspace - deletes layer In CS3 and older it will only work if the Move Tool has been selected Making layers (in)visible Alt click on a l...

Adbusting

Image
It's been a while and I wish you all a fantastic 2009. To start the new year some fun stuff. A new thing called Adbusting and a cool title sequence for an English TV cooking show. It's no longer made (one of them has passed away), but the show was so funny. I really like the title sequence. 4 super cool Subway Posters Several posters in the metro stations of Berlin have been plastered by the FTW crew with Photoshop Panels. This is called Adbusting. "Adbusting refers to the practice of making spoofs or parodies of corporate and political advertisements in order to make a statement" Click on the link below to see details of the Photoshopped poster that has stickers of photoshop panels stuck on them. I wonder which one of the ladies needed the most photoshopping. Adbusting Two Fat Ladies Cooking That really was the name of the show. On monday I will be posting Photoshop short cuts

Photoshop CS4 PixelBender

Image
On monday 17 november Adobe presented the first version of Pixel Bender Gallery Plug-in for PSD CS4. This new technology can apply filters in real time and super fast. No more watches, hour glasses (egg timers) or twirling candy. I installed it on my MacBook Pro and all the Pixelbender filters were applied immediately. But if you are working on a PC then Pixelbender works even faster, because a 64 bit version is available for Windows. Us Mac users have to settle for the 32 bit version, but it's pretty fast too. According to John Nack from Adobe it will also be available for After Effects and Flash. The filters developed for those applications will also work in Photoshop. Resulting in even more Photoshop filters. Click on this link to download the plug-in. Must admit Photoshop did crash after I had installed the plug-in, but resetting PSD helped that problem. To reset Photoshop while starting the application hold down Command-Option-Shift (Mac) Control-Alt-Shift (Win) keys. Here fo...

InDesign Autocorrect

Image
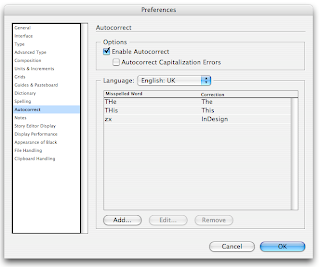
What a time saver the Autocorrect function has become for someone like me who has never had a formal typing class. Although I do use more then 2 fingers, I doubt I am even half as fast as the worst typist, on sleeping pills. I never really used the Autocorrect function in InDesign until recently. I am translating an InDesign theory from Dutch into English and the word InDesign appears on just about every page. Someone suggested that I use the Autocorrect as a keyboard shortcut for the word InDesign. Here's how: 1. In the InDesign menu go to Preferences> Autocorrect. 2. Check the Enable Autocorrect button 3. Select your language and make sure your document is also set to the same language. 4. Click Add and fill in the fields and click OK When your list is done click OK. Instead of typing the word InDesign, I just type the letters zx (keys next to each other and I don't think the letter combination will appear in the English theory book) and InDesign changes that into the ...

InDesign text frames

Image
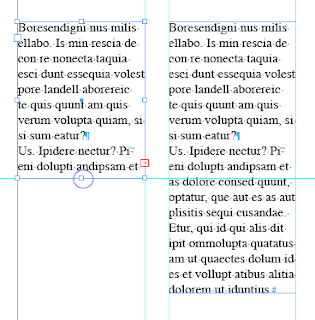
I posted a blog earlier about text frames but there's more. To adjust a text Frame in InDesign 1. Select the Selection Tool (black arrow) 2. It will change into a double headed arrow when hovering over an anchor point. Double click the anchor point. Her are some examples of what happens. I haven't put them all on but I think you get the point. If you have too much white space, double clicking the anchor points will automatically adjust the frames to fit.

InDesign tip: Numerals

Image
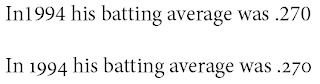
When printing was still being done using letterpresses there were two types of numerals available Tabular and Old style. Tabular The characters have the same width (occupying the same space). Tabular numerals are typically used to set material in which columns of characters must align vertically with one another. Old style numerals Numerals that do not align with one another as the tabular numerals do, but instead mainly occupy the x-height, with some numerals extending above the top of the x-height and some below the baseline. Old style was used for text and Tabular was used for price lists and forms etc. Along came DTP and we only had digital versions of fonts. Most of these typefaces only used tabular characters. This did not result in great looking design, the numbers were far too big and prominent on the page. Take a look at the following examples. You must admit that the second line looks a lot better. When InDesign was introduced, especially Open Type, classical typesetting c...

Photoshop tip: Photomerge

Image
This weekend was the most beautiful Autumn Sunday and Rudi armed with our simple 4.0 megapixel Camera (Canon Powershot G3), took some photos of the fantastic colours. He used Photoshops Automate>Photomerge to stitch together a poster. (Can't remember how many pixels, but the image was 2 metres by 72 cm at 150ppi). You can also use Lightroom 2.0 but, Lightroom does need Photoshop's help. Select the photos, go to Photo-Menu>Edit in>Merge to Panorama in Photoshop. I asked him how many photos he had used and he started to count 1,2,3,4 … 21. I was really impressed. Told him to post it in his blog, upload the colours to Kuler, sell it to Ikea as a door poster etc. etc. etc. While he was working on his blog, he calls me over and shows me this. An unbelievable photo of Yosemite National Park by Gerard Maynard. He created a 17 gigapixel image using 2000 photos. (Ikea door poster? This could line the Chunnel [tunnel from UK to France]. But he did have to work on a 96,5 Gigabyt...