Posts

Showing posts with the label Photoshop

Colour Picker

Image
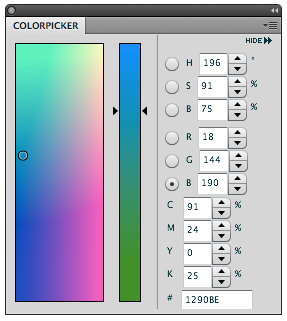
Via John Nacks blog I was shown a very useful panel for Photoshop CS4. If you install this panel then a Colour Picker panel will be added to Photoshop. This makes it easier and quicker to select colours. To download the panel click on this link to Anastasiy Safari. You need to extract the zip file. Place the whole folder in Applications> Adobe Photoshop CS4> Plug-Ins>Panels Folder. Restart Photoshop. Open the panel via Window> Extensions Because it is a CS4 panel it can be displayed in several ways. For example a simple button. Now that we are talking about the colour picker. Of course you all know that not all colours seen on screen are printable. To show the un-printable colours directly in the colour Picker go to the View menu> gamut Warning. The colour picker will grey out the un- printable colours. If you go to Image> Mode> 32 bit the colour picker will look completely different. InDesign and Illustrator contain a Colour picker dialogue box. Double click on ...
Dotted lines

Image
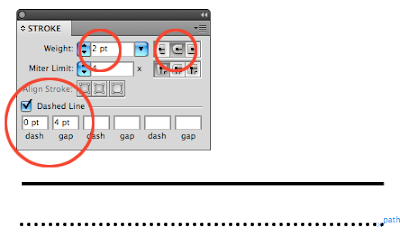
Dotted lines should be directly available in all the graphic applications. In the Creative Suite applications only InDesign has the dotted line option. In Photoshop and Illustrator you have to make them yourself. Dotted line in Illustrator I used this method in Illustrator 3.2 but it still works in CS4. Draw a line. Open the Stroke panel and make sure the options are available. Set the stroke weight to 2pt Set the cap end to rounded Check the option Dashed Line Set the dash value to 0pt and the gap value to 4pt. Setting the gap value to twice the stroke weight and the dash to 0, a dot will fit exactly in between. If you are happy with the result then make it a new graphic style. If you make it a brush it will retain the proportions between the gap and weight all other functions only the dots enlarge. Dotted lines in Photoshop photoshop doesn't have a standard dotted line stroke option. Select the Brush Tool Go to Windows> Brushes Select a brush size and set hardeness to100% Set ...

Photoshop tip: Clouds, Fire and smoke brushe

Image
Whoa it has been ages since I wrote on the blog. Been super busy, but I do have an arsenal stashed away and I will post more frequently this week. But to keep you busy here are some cool brushes. Via via I came across this amazing site with great Photoshop brushes. Especially the cloud, fire and smoke brushes work well. Qbrushes

Adbusting

Image
It's been a while and I wish you all a fantastic 2009. To start the new year some fun stuff. A new thing called Adbusting and a cool title sequence for an English TV cooking show. It's no longer made (one of them has passed away), but the show was so funny. I really like the title sequence. 4 super cool Subway Posters Several posters in the metro stations of Berlin have been plastered by the FTW crew with Photoshop Panels. This is called Adbusting. "Adbusting refers to the practice of making spoofs or parodies of corporate and political advertisements in order to make a statement" Click on the link below to see details of the Photoshopped poster that has stickers of photoshop panels stuck on them. I wonder which one of the ladies needed the most photoshopping. Adbusting Two Fat Ladies Cooking That really was the name of the show. On monday I will be posting Photoshop short cuts

Photoshop CS4 PixelBender

Image
On monday 17 november Adobe presented the first version of Pixel Bender Gallery Plug-in for PSD CS4. This new technology can apply filters in real time and super fast. No more watches, hour glasses (egg timers) or twirling candy. I installed it on my MacBook Pro and all the Pixelbender filters were applied immediately. But if you are working on a PC then Pixelbender works even faster, because a 64 bit version is available for Windows. Us Mac users have to settle for the 32 bit version, but it's pretty fast too. According to John Nack from Adobe it will also be available for After Effects and Flash. The filters developed for those applications will also work in Photoshop. Resulting in even more Photoshop filters. Click on this link to download the plug-in. Must admit Photoshop did crash after I had installed the plug-in, but resetting PSD helped that problem. To reset Photoshop while starting the application hold down Command-Option-Shift (Mac) Control-Alt-Shift (Win) keys. Here fo...

Photoshop tip: Photomerge

Image
This weekend was the most beautiful Autumn Sunday and Rudi armed with our simple 4.0 megapixel Camera (Canon Powershot G3), took some photos of the fantastic colours. He used Photoshops Automate>Photomerge to stitch together a poster. (Can't remember how many pixels, but the image was 2 metres by 72 cm at 150ppi). You can also use Lightroom 2.0 but, Lightroom does need Photoshop's help. Select the photos, go to Photo-Menu>Edit in>Merge to Panorama in Photoshop. I asked him how many photos he had used and he started to count 1,2,3,4 … 21. I was really impressed. Told him to post it in his blog, upload the colours to Kuler, sell it to Ikea as a door poster etc. etc. etc. While he was working on his blog, he calls me over and shows me this. An unbelievable photo of Yosemite National Park by Gerard Maynard. He created a 17 gigapixel image using 2000 photos. (Ikea door poster? This could line the Chunnel [tunnel from UK to France]. But he did have to work on a 96,5 Gigabyt...

Fisheye effect in Illustrator and Photoshop

Image
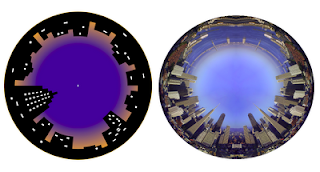
You are probably familiar with this effect. A fisheye lens is a wide-angle lens that takes in an extremely wide, hemispherical image. You can attain the same effects in Illustrator and photoshop. Fisheye in Illustrator. 1. Start with a drawing of a skyline. 2. Open the Brushes palette3. Select your drawing and drag it into the Brushes palette. Choose New Art Brush. In the Dialogue box check the Flip Across option. Click OK to save your drawing as a brush. 4. Draw a circle. 5. Select the brush you just made and your drawing is placed as a stroke around your circle. In the dialogue box there are various other options to choose and experiment from. The image below uses the Flip Along option. The Size Width gives you more variations. Fisheye in Photoshop Make a panoramic montage in Photoshop, or use a panoramic photo. (File>Automate>Photomerge … 1. Place the panoramic photo on a separate layer. The longer the image the better the effect. In this example I have mirrored the skyline o...

Photoshop Tip: Changing your Canvas size

Image
For many of you this tip might be old hat, but here goes. Of course you know that the crop tool is used to make your canvas smaller. But you can also use this tool to enlarge your canvas. 1. Make sure you have a grey area around your canvas. Type F twice for a full Screen Mode with Menu Bar. 2. Drag with the crop tool the size of your canvas. 3. Hold down the Option key and drag an anchor point to enlarge the crop. 4. Hit the return key. Photoshop adds to your original canvas. Of course you can use the Image menu Canvas Size … But this is so much quicker. The extra space is filled with the background colour which by default this is white, however in this example the background colour was set to black. A few keyboard short cuts: The D key sets the background colour to white and foreground to black. The X key swithches the back and foreground colours. 5. Use the Option palette if you want a specific size. Enter the size of the canvas you want and drag the Crop Tool. Hold down the Option ...

Photoshop a quick swimming pool effect

Image
As you can read in my profile I work closely with Rudi who also has a blog on design tips, but in Dutch. Not only is he an ACE (Adobe Certified Expert) and a brilliant teacher, his blog is really good too, but … in Dutch. We decided that I will translate certain articles which are not specific to the Dutch market, so as not to deprive the non Dutch readers, (which are a lot of you), of his tips and tricks. For those interested he also teaches in English. See www.opatel.nl … in Dutch, but there is an email address and phone number for info in English. This is one of Rudi's A quick swimming pool effect During the summer vacation, while lying by the pool I remembered a quick and easy Photoshop effect of water. This is not mine but Peter Kentie's who wrote monthly tips in MacWorld. So the honours go to him. If I am not mistaken, he is now manager marketing and media for PSV in Eindhoven and has a blog about WiFi. Here's how you do it. Open a New Photoshop document,...

Photoshop history

Finally a post. It has been quiet from this side of the pond at least blog-wise on the home front it has been quite noisy. The kids have had two weeks vacation and then it was catch-up time. But hope you enjoy the following tip. Photoshop is a perfect program to experiment in. Sometimes applied effects give the perfect result, but we can't always recall exactly how we did that? You could of coarse write down the whole process, or better yet let Photoshop do it for you. Photoshop can keep track of every action made. You, however must activate this option yourself by going to Photoshop-Preferences-General and activate the option History log. Then choose either Metadata, Text file or both. With Text file the actions can be read in a (printable) TextEdit file. The Metadata information can be found by going to File- File info…- History. There you can see every action applied and it's completely digital. Edit Log Items choose detailed to get a detailed description of what you did. T...

Cool brushes for Photoshop

You can make your own brush tips in Photoshop. I personally always make an oval one that I can change the angle of depending on where I need it. Select the brush tool, open the Brushes menu- Brush Tip Shape - the arrow rotates the brush and the 2 little "vector points" are for changing the roundness. The brush size can be enlarged using the ] key and decreased using the [ key. On deviantART's website there are some interesting and free downloadable brushes. Check out: http://javierzhx.deviantart.com/gallery/resources/?order=9 Place the downloaded files in Photoshop- Presets-Brushes