Posts

Showing posts with the label InDesign

Colour Picker

Image
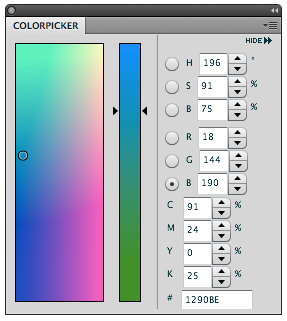
Via John Nacks blog I was shown a very useful panel for Photoshop CS4. If you install this panel then a Colour Picker panel will be added to Photoshop. This makes it easier and quicker to select colours. To download the panel click on this link to Anastasiy Safari. You need to extract the zip file. Place the whole folder in Applications> Adobe Photoshop CS4> Plug-Ins>Panels Folder. Restart Photoshop. Open the panel via Window> Extensions Because it is a CS4 panel it can be displayed in several ways. For example a simple button. Now that we are talking about the colour picker. Of course you all know that not all colours seen on screen are printable. To show the un-printable colours directly in the colour Picker go to the View menu> gamut Warning. The colour picker will grey out the un- printable colours. If you go to Image> Mode> 32 bit the colour picker will look completely different. InDesign and Illustrator contain a Colour picker dialogue box. Double click on ...
Alphabetical list in InDesign

Image
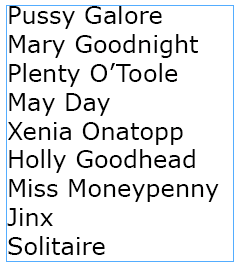
This tip ia about alphabetizing a list in InDesign. InDesign does not have a sort function, so if you need a list in alphabetical order it can be a problem, especially if it is really long. Here's a quick trick to make a list that can be updated at any time. 1. Make a list in InDesign 2. Define a paragraph style and apply it to the list. 3. Go to the menu Layout > table of Contents By default a title will be entered in the title field. Remove this and leave it blank. 4. In the Other styles (right field) select the style and click add. 5. In Entry style choose a paragraph style. This style will be applied to the list. For page number select No Page Number. 6. Click on the 'More Options' button and check the button 'Sort Entries in Alphabetical Order. 7. Click on OK and place the list. Always keep your original list. If you need to add enteries do this in the original list. Select the table of Contents and go to Layout> Update Table of Contents and the TOC will auto...

InDesign CS4 bug or is it a Mac thing

I had done some work at home on my fairly new imac OSX latest version etc. It was an InDesign CS4 document that I packaged and put on a USB stick. At work I needed to work on the document. It's the same type of Mac, InDesign CS4 english version, but when I opened the document an error message appeared complaining about Condtional text plugin updates and something else. Clicked OK, But InDesign could not open the document and told me to upgrade the plugins or the get lastest version of InDesign CS4. As far as I know we aren't yet higher then CS4 and I always update when prompted. Now it was panic time. When I asked a collegue what was going and I double clicked to open the document to show him the error, he noticed that InDy CS3 was trying to open the document and not automatically (as you would expect) CS4 (both were open on the computer), therefore the conflict with the plug-ins and new features and telling me to upgrade. Mac or InDy thing I don't know, but I'm glad I ...

InDesign Tip: Hyperlink to email

Image
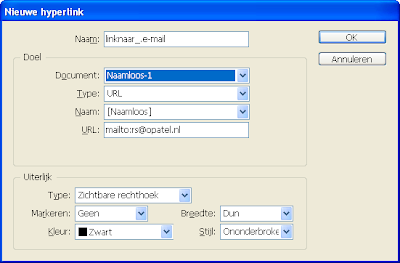
In InDesign you can make hyperlinks that work when exporting the file to PDF. One of the most useful hyperlinks is to an E-mail address. In InDesign CS3 and older it works as follows. 1. Type the text i.e. lindapasteuning@mac.com 2. Select the text with the text tool. 3. Go to Window> Interactive> Hyperlinks 4. Click on the Create New Hyperlink 5. Select URL in the type field 6. In the URL field type mailto:lindapasteuning@mac.com and click OK 7. Go to File> Export 8. Choose PDF and click save 9. Be sure to check the option hyperlinks in the dialogue box 10. Open the PDF and click on the hyperlink and your mail programme will automatically start up. In CS4 (we love CS4) it's even easier. In the Hyperlink panel there is an option to Link to Email in the pulldown menu. What's even beter is that you can add a character Style. And because it is fun Friday and almost Easter, check out this site. It takes a while to start, but is well worth it. Once it starts move your m...

InDesign tip: Connecting text paths and fun friday

Image
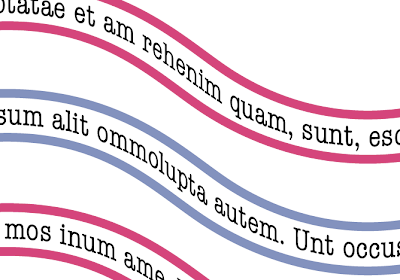
You might already know this, but you can place text on a path in InDesign. And just as you can thread text frames you can also thread text paths. Follow the following steps. 1. Draw a path with the pen or pencil tool. 2. Select the Type on a path Tool. This is behind the Type Tool in the Toolbox. 3. Find the beginning of the path. Wait till a plus sign appears next to the I bar (cursor) and click. The path has changed into a text path. 4. Duplicate the text path by selecting it with the selection tool (black arrow). Hold down the Alt key and drag. 5. Type Command-Shift-3 (mac) or Control-Shift-3 (win) to repeat this last action and make more text paths. 6. Select the first path with the selection tool. To the right and left of the path you will notice two squares. These are called text ports. Click on the right hand port. Go to the begining of the second path. Place the cursor over the square until you see a link symbol and click. The paths have now been joined. 7. Repeat step 6 for t...

InDesign Autocorrect

Image
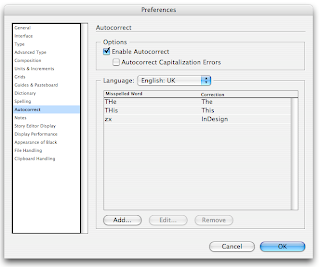
What a time saver the Autocorrect function has become for someone like me who has never had a formal typing class. Although I do use more then 2 fingers, I doubt I am even half as fast as the worst typist, on sleeping pills. I never really used the Autocorrect function in InDesign until recently. I am translating an InDesign theory from Dutch into English and the word InDesign appears on just about every page. Someone suggested that I use the Autocorrect as a keyboard shortcut for the word InDesign. Here's how: 1. In the InDesign menu go to Preferences> Autocorrect. 2. Check the Enable Autocorrect button 3. Select your language and make sure your document is also set to the same language. 4. Click Add and fill in the fields and click OK When your list is done click OK. Instead of typing the word InDesign, I just type the letters zx (keys next to each other and I don't think the letter combination will appear in the English theory book) and InDesign changes that into the ...

InDesign text frames

Image
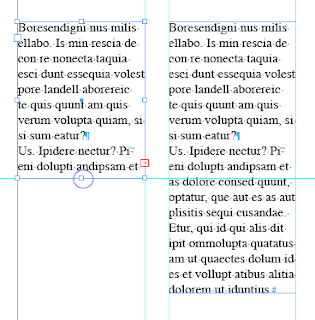
I posted a blog earlier about text frames but there's more. To adjust a text Frame in InDesign 1. Select the Selection Tool (black arrow) 2. It will change into a double headed arrow when hovering over an anchor point. Double click the anchor point. Her are some examples of what happens. I haven't put them all on but I think you get the point. If you have too much white space, double clicking the anchor points will automatically adjust the frames to fit.

InDesign tip: Numerals

Image
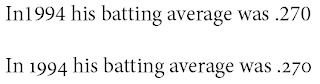
When printing was still being done using letterpresses there were two types of numerals available Tabular and Old style. Tabular The characters have the same width (occupying the same space). Tabular numerals are typically used to set material in which columns of characters must align vertically with one another. Old style numerals Numerals that do not align with one another as the tabular numerals do, but instead mainly occupy the x-height, with some numerals extending above the top of the x-height and some below the baseline. Old style was used for text and Tabular was used for price lists and forms etc. Along came DTP and we only had digital versions of fonts. Most of these typefaces only used tabular characters. This did not result in great looking design, the numbers were far too big and prominent on the page. Take a look at the following examples. You must admit that the second line looks a lot better. When InDesign was introduced, especially Open Type, classical typesetting c...

InDesign ✓ or - in the Object Style Palette

Image
Ever wondered what the difference is between the check (✓) or the minus sign (-) in the Object Style dialogue box? These symbols are used when making a new Object Style. The difference is quite subtle, but it's useful to know. Here's an example. 1. Open the Object Styles palette. 2. Choose a New Object Style. You will notice that in the Attributes dialogue box by default, Paragraph Styles and Frame Fitting Options have a (-) in the check box and the others have a (✓). The (-) sign means that the function is to be ignored. For instance, if you want to make an Object Style with a fixed fill, but a variable stroke colour and weight. Place a (-) next to the stroke option and InDesign will ignore the stroke when the Object Style is applied to a new object. Of course you can change the stroke weight or colour of the object after a style has been applied, but when the object is selected a (+) will appear next to the style name meaning some attribute(s) is different from the Object Sty...

InDesign tip: combining two documents

Image
I was translating a Photoshop theory for a client, 'Photoshop_english'. Half way through the client decided to eliminate 2 chapters that I had already finished. I saved the doc. as 'English_2', keeping the first version. In 'English_2' I deleted the extra pages and continued translating and replacing Dutch screen shots with English ones. When 'English_2' was finished the client decided he also wanted the extended version. Great, now I needed to put back the 2 'deleted' chapters into the finished document 'English_2'. (Thank goodness I had saved the half way done version). Quickly adding pages from one document to another without copy pasting. 1. Open both documents. Go to Window>Arrange>Tile. 2. Activate the document with the pages you want to copy. 3. Select the pages in the Pages Palette. Drag the page icons on top of the document that you want to add the pages to. It doesn't matter where, InDesign will automatically add the ...

Gravity in InDesign

I have often put type on a path in InDesign and then chosen a different "Type on a Path Option". (The default is Rainbow.) The other options look fine if that's the look I want, but when  I choose the gravity option either nothing happens or aaargh …  click that one away. The problem was I had no idea what it was doing to the type. Until the other day I came across this podcast at www. mogo-media.com and was blown away. Rufus Deuchler also shows you the correct use of the drop shadow. Not as an effect behind type  like 'I've seen on too many pizza take away folders and flyers. Here's the link  http://www.mogo-media.com/podcasts/indesign/gravity_effect/ Thank you so much Mr. Deuchler

Where's my type gone?

Have you ever experienced the following situation? Your InDesign file uses 2 columns, you want to change this into 3 columns, but when you do this, a portion of your type disappears and the red square with an x appears. No "insert break character has been used, no new paragraph, the columns are wide enough to fit the type. There just seems to be no reason why the type doesn't flow on. Here are some possible causes. 1. The No break option has been applied to a word or words. This option ensures that words are never hyphenated and stay together including the spaces before or after the word(s) if they too have been selected. 2. In the hyphenation settings menu "the before last" number has been set too high.