Wednesday, December 9, 2009

illustrator tip:Rounded rectangle

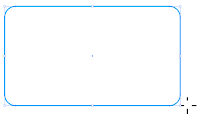
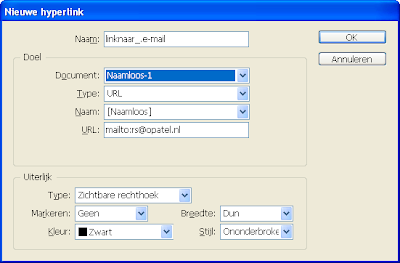
So I haven't been active for a while on my blog, that's because I have been keeping a dutch one for my work. Which I suppose I could easily translate and copy to here, uhmm… bad excuse, however that sounds better then I don't have time because we got a puppy, which is the truth. Boy, puppies need a lot of time, but she is worth it.

Well here's the tip.

When you use the rounded rectangle tool by dragging, the corner radius used is the last value entered in the rounded rectangle panel's corner radius field. The size you determine by dragging, hold down the Space bar to change the position and hold down the Alt key to draw from the centre. Here's how you can alter the corner radius while dragging.

1. Select the rounded rectangle tool and drag a rectangle. Do not release the mouse.2. Use the up arrow to increase the corner radius.use the down arrow to decrease the radius.The left arrow makes it a rectangleand the left arrow gives you the maximum corner radius.Once you release the mouse the arrows function as the always do, to move selected objects.

I will try to be better at leaving tips, I have enough up my sleeve, but look at the picture below to see what's keeping me very busy. Leslie and Minou. And yes, baseball.

Friday, June 12, 2009

Illustrator tip: Resizing your artboard in CS4

This tip is only for CS4 users. (IMHO it's worth getting if you don't have it yet )
Say you've made an illustration on an A4 sized artboard, but your illustration is a lot smaller and you want to get rid of the excess white paper. That can easily be solved.
In the example below the black stroke is the A4 paper.
1. Draw a rectangle on top of the illustration. This will be your new page size. Make sure the rectangle is selected.2. Select the Artboard Tool (shift o) to select the A4 artboard.3. Double click on the rectangle. The rectangle now becomes the new page size.4. Select the rectangle with the direct selection tool and delete it. You now have an artboard (page) the same size as the rectangle.
And because it is fun friday check out this site Logolounge. Actually this is serious stuff for designers.

Wednesday, May 20, 2009

Live paint

Live paint is an function in Illustrator which in my opinion doesn't get enough attention and it is a powerful tool. Pathfinders cut the shapes into separate shapes whereas live paint leaves the objects editable it's non destructive. Here's a simple example of a simple info graphic illustration made with live paint showing the average beer consumption.

1. I drew a typical dutch beer glass.2. With the pen tool i drew a line marking the top of the beer (beer line).3. Select the glass and 'beer line', select the live Paint tool in the toolbox and click to make a live paint group. You can also go to Object> Live Paint> Make.


4. The separate parts of the illustration will now have a thick red border when hovering above them to show you the live paint sections. When selected the anchor points with the crosshairs shows you that it is a 'Live Paint Group'

5. Select a yellow swatch, select the Live paint tool and click in the lower part of the glass.6. Select the 'beer line' with the group selection tool and drag it up or down to change the amount of beer in the glass.Give the 'beer line' a stroke of none to hide it.
The first glass has been copied and the 'beer line' simply dragged down.

How much the average consumption is I have no idea. If I have to go by our last BBQ all the glasses would be filled to the rim and the scale larger ; - ) Cheers.

Monday, May 18, 2009

Nederlands voor DTP'ers

Ik geef direct toe dat mijn Nederlands ook niet is wat het zou moeten zijn. De tussen-n dacht ik eindelijk onder de knie te hebben totdat men weer een paar uitzonderingen uit de hoge hoed toverde. Daarom maak ik begrijp van allerlei websites en naslagwerken.


De taalunie heeft haar eigen website. Hier vind je informatie over aanhalingstekens, haakjes en comma's.
Klik op deze link.


Eén van mijn favoriete sites is de website van Onze Taal. Deze site gaat vooral over het taalgebruik binnen onze maatschappij. Dus ook over sms-en, voetbaltaal, etc.
Klik op deze link.


Een boek dat ik vaak uit de kast haal is 'Redactiewijzer' van P.J. van der Horst. Erg handig voor grafici en ontwerpers. Hierin vind je antwoorden op vragen als; hoe zet ik een opsomming, telefoonnummer en postcode?
Klik op deze link.

Tuesday, May 12, 2009

Colour Picker

Via John Nacks blog I was shown a very useful panel for Photoshop CS4. If you install this panel then a Colour Picker panel will be added to Photoshop. This makes it easier and quicker to select colours.
To download the panel click on this link to Anastasiy Safari. You need to extract the zip file. Place the whole folder in Applications> Adobe Photoshop CS4> Plug-Ins>Panels Folder. Restart Photoshop. Open the panel via Window> Extensions
Because it is a CS4 panel it can be displayed in several ways.
For example a simple button.
Now that we are talking about the colour picker. Of course you all know that not all colours seen on screen are printable. To show the un-printable colours directly in the colour Picker go to the View menu> gamut Warning. The colour picker will grey out the un- printable colours.

If you go to Image> Mode> 32 bit the colour picker will look completely different.

InDesign and Illustrator contain a Colour picker dialogue box. Double click on the fill colour in the toolbox to open the colour picker dialogue box.

Dialogue box? Panel? The difference lies in that the dialogue box needs to be confirmed with the OK button and disappears until opened again. The colour picker panel in PS floats above your window.

Tuesday, May 5, 2009

Alphabetical list in InDesign

This tip ia about alphabetizing a list in InDesign. InDesign does not have a sort function, so if you need a list in alphabetical order it can be a problem, especially if it is really long. Here's a quick trick to make a list that can be updated at any time.

1. Make a list in InDesign
2. Define a paragraph style and apply it to the list.3. Go to the menu Layout > table of Contents
By default a title will be entered in the title field. Remove this and leave it blank.
4. In the Other styles (right field) select the style and click add.
5. In Entry style choose a paragraph style. This style will be applied to the list. For page number select No Page Number.
6. Click on the 'More Options' button and check the button 'Sort Entries in Alphabetical Order.
7. Click on OK and place the list.
Always keep your original list. If you need to add enteries do this in the original list. Select the table of Contents and go to Layout> Update Table of Contents and the TOC will automatically be updated.

Monday, April 27, 2009

Illustrator tip Mirror images

Ever heard of the Rorschach inkblot test? Good news you can draw them yourself in Illustrator. Who knows you may find out more about your inner self.

It works as follows
1. Draw an object and select it.


2. Go to Effect> Distort and Transform> Transform.
3. Enter the following values and check the Reflect Y. Make sure the reference point is below and centre and set copies to 1. Click OK. A copy of your image will be placed.

4. Select the object.5. Go to Window> Graphic Styles and click on the new graphic style icon to add the style. Now you can apply this Graphic Styles to any object.

6. You can also apply the style to a layer. Make a new layer. target this layer by clicking on the button. Then click on the graphic style. The style will now be applied to everything you draw.

Tuesday, April 14, 2009

InDesign CS4 bug or is it a Mac thing

I had done some work at home on my fairly new imac OSX latest version etc. It was an InDesign CS4 document that I packaged and put on a USB stick. At work I needed to work on the document. It's the same type of Mac, InDesign CS4 english version, but when I opened the document an error message appeared complaining about Condtional text plugin updates and something else. Clicked OK, But InDesign could not open the document and told me to upgrade the plugins or the get lastest version of InDesign CS4. As far as I know we aren't yet higher then CS4 and I always update when prompted. Now it was panic time.
When I asked a collegue what was going and I double clicked to open the document to show him the error, he noticed that InDy CS3 was trying to open the document and not automatically (as you would expect) CS4 (both were open on the computer), therefore the conflict with the plug-ins and new features and telling me to upgrade.
Mac or InDy thing I don't know, but I'm glad I now know what to look out for.

Friday, April 10, 2009

InDesign Tip: Hyperlink to email

In InDesign you can make hyperlinks that work when exporting the file to PDF. One of the most useful hyperlinks is to an E-mail address. In InDesign CS3 and older it works as follows.

1. Type the text i.e. lindapasteuning@mac.com
2. Select the text with the text tool.
3. Go to Window> Interactive> Hyperlinks
4. Click on the Create New Hyperlink
5. Select URL in the type field


6. In the URL field type mailto:lindapasteuning@mac.com and click OK
7. Go to File> Export
8. Choose PDF and click save
9. Be sure to check the option hyperlinks in the dialogue box
10. Open the PDF and click on the hyperlink and your mail programme will automatically start up.

In CS4 (we love CS4) it's even easier. In the Hyperlink panel there is an option to Link to Email in the pulldown menu. What's even beter is that you can add a character Style.

And because it is fun Friday and almost Easter, check out this site. It takes a while to start, but is well worth it. Once it starts move your mouse. Super cool. Here's the link.

Wednesday, April 8, 2009

InDesign tip: Quick Apply

If you want to apply a paragraph style to text, this can be done via several different panels. The paragraph styles panel, the pulldown menu in the control bar and less known via 'Quick Apply". Place the text cursor in the paragraph. Use the keys Command-enter (Mac) Control-enter (Win) and a panel will open with a list of all your styles. Click on the desired style for your paragraph and press the enter key.

As you can see there is a lot more then just styles in the list. You can also select menus, tools, etc.

By typing the first few letters of your style InDesign will find that style for you in the list. That's why you should give your styles logical and sensible names. Press the enter key to apply the style.

Friday, March 20, 2009

InDesign tip: Connecting text paths and fun friday

You might already know this, but you can place text on a path in InDesign. And just as you can thread text frames you can also thread text paths.


Follow the following steps.
1. Draw a path with the pen or pencil tool.2. Select the Type on a path Tool. This is behind the Type Tool in the Toolbox.

3. Find the beginning of the path. Wait till a plus sign appears next to the I bar (cursor) and click. The path has changed into a text path.4. Duplicate the text path by selecting it with the selection tool (black arrow). Hold down the Alt key and drag. 5. Type Command-Shift-3 (mac) or Control-Shift-3 (win) to repeat this last action and make more text paths.6. Select the first path with the selection tool. To the right and left of the path you will notice two squares. These are called text ports. Click on the right hand port.
Go to the begining of the second path. Place the cursor over the square until you see a link symbol and click. The paths have now been joined.


7. Repeat step 6 for the other paths.

8. Select the Type on a path Tool and click on the first path. Type your desired text and you will see that the text continues on the next text path.Change the shape.
You can also change the way the type looks after it has been placed. Select one or more of the paths and go to Type> Type on a Path and select an option.

Modify the path.
Remember that the path is still a path and can be modified using the selection tools or other tools from the toolbox to change the attributes. In this example I have given the path a double stroke and a colour.


And since it is fun friday check out these statues.
statues This one is missing. It's in Holland and supposed to be Santa holding a Christmas tree, but the locals have named it Kabouter (gnome) Butt plug. Yeah right Christmas tree.