Friday, March 20, 2009

InDesign tip: Connecting text paths and fun friday

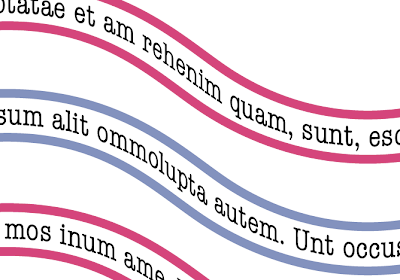
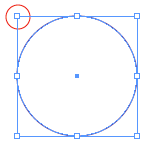
You might already know this, but you can place text on a path in InDesign. And just as you can thread text frames you can also thread text paths.


Follow the following steps.
1. Draw a path with the pen or pencil tool.2. Select the Type on a path Tool. This is behind the Type Tool in the Toolbox.

3. Find the beginning of the path. Wait till a plus sign appears next to the I bar (cursor) and click. The path has changed into a text path.4. Duplicate the text path by selecting it with the selection tool (black arrow). Hold down the Alt key and drag. 5. Type Command-Shift-3 (mac) or Control-Shift-3 (win) to repeat this last action and make more text paths.6. Select the first path with the selection tool. To the right and left of the path you will notice two squares. These are called text ports. Click on the right hand port.
Go to the begining of the second path. Place the cursor over the square until you see a link symbol and click. The paths have now been joined.


7. Repeat step 6 for the other paths.

8. Select the Type on a path Tool and click on the first path. Type your desired text and you will see that the text continues on the next text path.Change the shape.
You can also change the way the type looks after it has been placed. Select one or more of the paths and go to Type> Type on a Path and select an option.

Modify the path.
Remember that the path is still a path and can be modified using the selection tools or other tools from the toolbox to change the attributes. In this example I have given the path a double stroke and a colour.


And since it is fun friday check out these statues.
statues This one is missing. It's in Holland and supposed to be Santa holding a Christmas tree, but the locals have named it Kabouter (gnome) Butt plug. Yeah right Christmas tree.


Wednesday, March 4, 2009

Geometric shapes in Illustrator

You all know there are several ways to draw a geometric shape in Illustrator. Select the shape in the Toolbox and click and drag across your artboard. Where you click is the top left corner of your rectangle, ellipse or rounded rectangle and it is a fixed point. However a Star or polygon are drawn with the centre as the fixed point. Use the arrow keys, while dragging a star or polygon to increase or decrease the points or sides.

To draw a shape with exact dimensions select the shape in the toolbox and click once on your artboard to open the shapes dialogue box. Enter the dimensions. To make a square or a circle you need only fill in one of the dimensions and then click on the word height or width (which ever has not been entered) the text field will automatically be filled with the same value.
As reference point, the same applies when using the dialogue box. Where you click is either the centre or left hand corner depending on the shape.

By default the rectangle, ellipse and rounded rectangles all show a centre point when selected. The polygon and star don't. However if you need to know where the centre point is then select the shape, open the attributes panel and click on the show centre button.