Guides in InDesign
I presume you know that guides can be dragged out of the rulers on the left and top of your document but here are some handy shortcuts and tips.
Key commands for guides
Command ; hides shows the guides
Alt Control ; locks and unlocks guides
Shift Command ; makes them magnetic (snap to guide)
Command L locks only the selected guides
Double click on the ruler on the left and a horizontal guide will be placed, the top ruler will place a vertical guide
Next to or on the page
If you drag a guide out of a ruler and release on the page the guide will go across the page, release the mouse button next to the page and the guide crosses the entire pasteboard, which is handy when using spreads. Dragging an existing guide or one out of the ruler while holding down the command key and it will always cross the pasteboard.
Whole numbers
Dragging a guide while holding down the shift key and the guide will always be placed on a “whole” number when using millimetres and on increments of 1/8 inch when using inches and 6pts if using points etc.
Moving guides and selecting guides
Guides can be locked and unlocked with either the pull down menu View Grids and Guides or the key combination command shift ;
When unlocked they can be selected with the selection arrows and moved by either dragging and releasing or by selecting the guide and placing the cursor in the x or y palette and using the up/down, left/right keys.

Duplicating guides
Select the guide and place your cursor in the x y palette and hold down the option key and press the up or down keys. With the option and shift keys held down the steps become larger. Guides can also be copied Command C and pasted into other documents Command V. They are placed on the same x or y coordinate.
Deleting guides
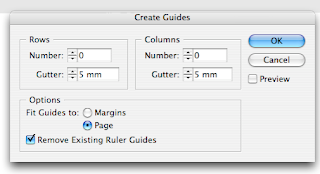
If there are no other elements on the page all the guides can be selected with the key combination Command A. For this reason I often use a separate layer for guides. However to get rid of all your guides without having to select each and everyone when there are other elements on the page. Go to the Layout menu Create Guides check the Remove existing Ruler guides and fill in Rows 0 and Columns 0.
 Guide scripts
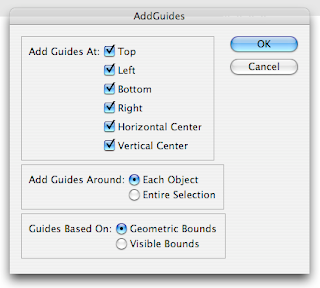
guides can automatically be put around any object using scripts. Select the object go to the pull-down menu Window Automation Scripts. There are many handy scripts there amongst them AddGuides.jsx In the script there are many options for the guides.
In CS3 these scripts are automatically installed, in CS2 they are on the CD in extra’s and have to be installed. Just drag it to the folder Scripts in the InDesign folder.
Step and repeat
We all know the step and repeat function. This can also be used for the guides. Select the guide go to Edit Step and Repeat or use the key combination Option Command U.
You can also evenly distribute the guides between two points using the Align palette. Place the first guide where you want to start, the second guide where you want to finish, add more guides randomly between the two. Select all the guides and using the align palette click on Distribute Spacing and the guides will be evenly distributed between the top and bottom right and left guide.
Guides in the library
If you have a layout using guides and would like to use this for other projects for example a monthly news letter then you can keep the layout with guides in a library. Place the guides where you want them. Under File New choose Library. Give it a logical name and store it in an equally logical place. A palette will appear with the name you just chose. Using the fly-out menu (little triangle) choose Add Items on Page. These guides can now be placed in a new document by going to File Open choose the file (ending in indl) and using the fly-out menu Place Item(s).
If your guides are on the pasteboard you will see only a white rectangle in your library (centre image) however the guides will be placed.
Key commands for guides
Command ; hides shows the guides
Alt Control ; locks and unlocks guides
Shift Command ; makes them magnetic (snap to guide)
Command L locks only the selected guides
Double click on the ruler on the left and a horizontal guide will be placed, the top ruler will place a vertical guide
Next to or on the page
If you drag a guide out of a ruler and release on the page the guide will go across the page, release the mouse button next to the page and the guide crosses the entire pasteboard, which is handy when using spreads. Dragging an existing guide or one out of the ruler while holding down the command key and it will always cross the pasteboard.
Whole numbers
Dragging a guide while holding down the shift key and the guide will always be placed on a “whole” number when using millimetres and on increments of 1/8 inch when using inches and 6pts if using points etc.
Moving guides and selecting guides
Guides can be locked and unlocked with either the pull down menu View Grids and Guides or the key combination command shift ;
When unlocked they can be selected with the selection arrows and moved by either dragging and releasing or by selecting the guide and placing the cursor in the x or y palette and using the up/down, left/right keys.

Hold down the shift key and the guides will move in larger increments depending on your preferences. The increments can be changed in the keyboard increments panel found in the pull down menu InDesign, preferences, units and increments.
Duplicating guides
Select the guide and place your cursor in the x y palette and hold down the option key and press the up or down keys. With the option and shift keys held down the steps become larger. Guides can also be copied Command C and pasted into other documents Command V. They are placed on the same x or y coordinate.
Deleting guides
If there are no other elements on the page all the guides can be selected with the key combination Command A. For this reason I often use a separate layer for guides. However to get rid of all your guides without having to select each and everyone when there are other elements on the page. Go to the Layout menu Create Guides check the Remove existing Ruler guides and fill in Rows 0 and Columns 0.
 Guide scripts
guides can automatically be put around any object using scripts. Select the object go to the pull-down menu Window Automation Scripts. There are many handy scripts there amongst them AddGuides.jsx In the script there are many options for the guides.
In CS3 these scripts are automatically installed, in CS2 they are on the CD in extra’s and have to be installed. Just drag it to the folder Scripts in the InDesign folder.

Step and repeat
We all know the step and repeat function. This can also be used for the guides. Select the guide go to Edit Step and Repeat or use the key combination Option Command U.
You can also evenly distribute the guides between two points using the Align palette. Place the first guide where you want to start, the second guide where you want to finish, add more guides randomly between the two. Select all the guides and using the align palette click on Distribute Spacing and the guides will be evenly distributed between the top and bottom right and left guide.
Guides in the library
If you have a layout using guides and would like to use this for other projects for example a monthly news letter then you can keep the layout with guides in a library. Place the guides where you want them. Under File New choose Library. Give it a logical name and store it in an equally logical place. A palette will appear with the name you just chose. Using the fly-out menu (little triangle) choose Add Items on Page. These guides can now be placed in a new document by going to File Open choose the file (ending in indl) and using the fly-out menu Place Item(s).
If your guides are on the pasteboard you will see only a white rectangle in your library (centre image) however the guides will be placed.




Comments